はじめに
以前HDRPでカスタムシェーダーを作成する方法をUnlit形式で紹介しました。
今回はHDRPで影を出す、影を受け取る方法についてです。
最小限ということで影響を受ける光はまず「1つのみ」とします。
開発環境
- Unity2022.3.4f1
- HDRP14.08
成果物
最終的に以下のような見た目になります。PlaneとCube二つには同じShaderを使っており、落ち影やほかの落ち影の影響をうけることが確認できます。

Shader
まずはShader全文です。見慣れないincludeファイルがありますが一つ一つ解説していきます。
Shader "Custom/SampleLit"
{
    Properties
    {
        _MainTex ("Texture", 2D) = "white" {}
    }
    SubShader
    {
        Tags
        {
            "RenderType"="Opaque"
            "RenderPipeline"="HDRenderPipeline"
        }
        LOD 100

        Pass
        {
            Tags {"LightMode" = "Forward"}
            HLSLPROGRAM
            #pragma vertex vert
            #pragma fragment frag
            #include "Packages/com.unity.render-pipelines.core/ShaderLibrary/Common.hlsl"
            #include "Packages/com.unity.render-pipelines.high-definition/Runtime/ShaderLibrary/ShaderVariables.hlsl"
            #include "Packages/com.unity.render-pipelines.high-definition/Runtime/Lighting/LightLoop/HDShadow.hlsl"

            #pragma multi_compile SHADOW_LOW SHADOW_MEDIUM SHADOW_HIGH SHADOW_VERY_HIGH
            #pragma multi_compile_fragment AREA_SHADOW_MEDIUM AREA_SHADOW_HIGH
            #include "Packages/com.unity.render-pipelines.high-definition/Runtime/Material/NormalBuffer.hlsl"

            struct appdata
            {
                float4 vertex : POSITION;
                float2 uv : TEXCOORD0;
                float3 normal : NORMAL;
            };

            struct v2f
            {
                float2 uv : TEXCOORD0;
                float4 vertex : SV_POSITION;
                float3 normal : NORMAL;
                float4 positionSS : TEXCOORD1;
                float3 positionWS : TEXCOORD2;
            };

            TEXTURE2D(_MainTex);
            SAMPLER(sampler_MainTex);
            float4 _MainTex_ST;

            v2f vert (appdata v)
            {
                v2f o;
                o.vertex = TransformObjectToHClip(v.vertex);
                o.uv = TRANSFORM_TEX(v.uv, _MainTex);
                o.normal = TransformObjectToWorldNormal(v.normal);

                float4 ss = o.vertex * 0.5f;
                ss.xy = float2(ss.x, ss.y * _ProjectionParams.x) + ss.w;
                ss.zw = o.vertex.zw;
                o.positionSS = ss;

                o.positionWS = TransformObjectToWorld(v.vertex);
                return o;
            }

            float4 frag (v2f i) : SV_Target
            {
                DirectionalLightData directionalLightData = _DirectionalLightDatas[0];

                HDShadowContext shadowContext = InitShadowContext();
                float3 shadow = GetDirectionalShadowAttenuation(
                    shadowContext,
                    i.positionSS.xy,
                    i.positionWS,
                    i.normal,
                    directionalLightData.shadowIndex,
                    -directionalLightData.forward);

                float4 mainColor = SAMPLE_TEXTURE2D(_MainTex, sampler_MainTex, i.uv);
                mainColor.rgb *= shadow.r;
                return mainColor;
            }
            ENDHLSL
        }
        Pass
        {
            Name "ShadowCaster"
            Tags {"LightMode" = "ShadowCaster"}

            HLSLPROGRAM
            #pragma vertex vert
            #pragma fragment frag
            #pragma multi_compile_shadowcaster
            #include "Packages/com.unity.render-pipelines.core/ShaderLibrary/Common.hlsl"
            #include "Packages/com.unity.render-pipelines.high-definition/Runtime/ShaderLibrary/ShaderVariables.hlsl"

            struct appdata
            {
                float4 vertex : POSITION;
                float3 normal : NORMAL;
                float2 texcoord : TEXCOORD0;
            };

            struct v2f
            {
                float4 pos : SV_POSITION;
            };

            v2f vert(appdata i)
            {
                v2f o;
                o.pos = TransformObjectToHClip(i.vertex);
                return o;
            }

            float4 frag(v2f i) : SV_Target
            {
                return 0;
            }

            ENDHLSL
        }
    }
}
影を落とす
影を落とすのはURPなどと同様に影を落とすようのパスを追加します。
LightModeをShadowCasterにしないと判別されないので注意です。この辺はURPと同様ですね。
Pass
{
    Name "ShadowCaster"
    Tags {"LightMode" = "ShadowCaster"}

     HLSLPROGRAM
     #pragma vertex vert
     #pragma fragment frag
     #pragma multi_compile_shadowcaster
     #include "Packages/com.unity.render-pipelines.core/ShaderLibrary/Common.hlsl"
     #include "Packages/com.unity.render-pipelines.high-definition/Runtime/ShaderLibrary/ShaderVariables.hlsl"

     struct appdata
     {
         float4 vertex : POSITION;
         float3 normal : NORMAL;
         float2 texcoord : TEXCOORD0;
      };

      struct v2f
      {
          float4 pos : SV_POSITION;
      };

      v2f vert(appdata i)
      {
          v2f o;
          o.pos = TransformObjectToHClip(i.vertex);
          return o;
      }

      float4 frag(v2f i) : SV_Target
      {
          return 0;
      }

      ENDHLSL
}
普段よく使うような関数は以下のインクルードファイルの中に入っていました。
#include "Packages/com.unity.render-pipelines.core/ShaderLibrary/Common.hlsl"
#include "Packages/com.unity.render-pipelines.high-definition/Runtime/ShaderLibrary/ShaderVariables.hlsl"
影を受け取る
影を受け取るのが少し大変だったのですが一つ一つ見てみます。
URPであったようなGetMainLight()やGetAdditionalLight()というような便利関数がHDRPにはありません。
まずはDirectionalLightの取得ですがHDRPでは_DirectionalLightDatasというStructuredBufferにシーン内のDirectionalLightが入ってきます。 実装されているのは以下で示すようなShaderVariablesLightLoop.hlslです。
#include "Packages/com.unity.render-pipelines.high-definition/Runtime/Lighting/LightDefinition.cs.hlsl"
#include "Packages/com.unity.render-pipelines.high-definition/Runtime/Core/Utilities/GeometryUtils.cs.hlsl"

// don't support Buffer yet in unity
StructuredBuffer<uint>  g_vBigTileLightList;

StructuredBuffer<uint>  g_vLightListTile;
StructuredBuffer<uint>  g_vLightListCluster;

StructuredBuffer<uint>  g_vLayeredOffsetsBuffer;
StructuredBuffer<float> g_logBaseBuffer;

#ifdef USE_INDIRECT
    StructuredBuffer<uint> g_TileFeatureFlags;
#endif

StructuredBuffer<DirectionalLightData> _DirectionalLightDatas;
StructuredBuffer<LightData>            _LightDatas;
StructuredBuffer<EnvLightData>         _EnvLightDatas;

// Used by directional and spot lights
TEXTURE2D(_CookieAtlas);

// Used by cube and planar reflection probes
TEXTURE2D_ARRAY(_ReflectionAtlas);

// Contact shadows
TEXTURE2D_X_UINT(_ContactShadowTexture);

// Screen space shadows
TEXTURE2D_ARRAY(_ScreenSpaceShadowsTexture);

// Indirect Diffuse Texture
TEXTURE2D_X(_IndirectDiffuseTexture);
今回はDirectionalLightが一つということで進めていくので配列の0番目を取得します。
DiectionalLightが複数の時の実装方法はまた別途書こうと思います。
float4 frag (v2f i) : SV_Target
{
    DirectionalLightData directionalLightData = _DirectionalLightDatas[0];

    HDShadowContext shadowContext = InitShadowContext();
    float3 shadow = GetDirectionalShadowAttenuation(
                    shadowContext,
                    i.positionSS.xy,
                    i.positionWS,
                    i.normal,
                    directionalLightData.shadowIndex,
                    -directionalLightData.forward);
}
DirectionalLightを取得しましたがそこからまた呪文が続いています。
HDShadowContext shadowContext = InitShadowContext();
float3 shadow = GetDirectionalShadowAttenuation(
                    shadowContext,
                    i.positionSS.xy,
                    i.positionWS,
                    i.normal,
                    directionalLightData.shadowIndex,
                    -directionalLightData.forward);
ここがShadowMapから影の情報を取得し、shadowAttenuationを取得する関数です。実はHDRPのLit.shaderの中身での影の受け取りはほかにもいろいろやっているのですが、最小限ではこのぐらいでよさそうです。
InitShadowContext()はHDShadowContext.hlslで定義されている関数でシャドウデータを取得する初期化のような関数です。
以下はHDShadowContext.hlslの切り抜きです。
///////// 中略

StructuredBuffer<HDShadowData>              _HDShadowDatas;
// Only the first element is used since we only support one directional light
StructuredBuffer<HDDirectionalShadowData>   _HDDirectionalShadowData;

HDShadowContext InitShadowContext()
{
    HDShadowContext         sc;

    sc.shadowDatas = _HDShadowDatas;
    sc.directionalShadowData = _HDDirectionalShadowData[0];

    return sc;
}

////// 中略
これらを使用するために必要なファイルをインクルードしています。
#include "Packages/com.unity.render-pipelines.high-definition/Runtime/Lighting/LightLoop/HDShadow.hlsl"
また、以下のマクロを使用しています。
#pragma multi_compile SHADOW_LOW SHADOW_MEDIUM SHADOW_HIGH SHADOW_VERY_HIGH
#pragma multi_compile_fragment AREA_SHADOW_MEDIUM AREA_SHADOW_HIGH
GetDirectionalShadowAttenuationという関数の引数に必要な変数がpositionSS(スクリーンスペース)、positionWS(ワールドスペース)、normal(法線情報)が必要なので頂点シェーダーのほうで格納しています。
v2f vert (appdata v)
{
    v2f o;
    o.vertex = TransformObjectToHClip(v.vertex);
    o.uv = TRANSFORM_TEX(v.uv, _MainTex);
    o.normal = TransformObjectToWorldNormal(v.normal);

    float4 ss = o.vertex * 0.5f;
    ss.xy = float2(ss.x, ss.y * _ProjectionParams.x) + ss.w;
    ss.zw = o.vertex.zw;
    o.positionSS = ss;

    o.positionWS = TransformObjectToWorld(v.vertex);
    return o;
}
最後にShadowの色味をテクスチャの色味に乗算することで今回はシャドウを表現しました。
float4 mainColor = SAMPLE_TEXTURE2D(_MainTex, sampler_MainTex, i.uv);
mainColor.rgb *= shadow.r;
return mainColor;
設定
最後にUnityの設定を行います。 上記のシェーダーをCubeとPlaneにアタッチすると以下のようにシャドウが汚く見えます。

これを改善するには、、、!と設定周りを探してみると方法が二つありました。
一つ目はDirectionalLight側の設定を調整する方法です。実はこのシャドウの汚さはShadow Filtering Qualityに由来するものでした。
このShadow Filtering Qualityは以下にドキュメントがありました。
Highに設定するとパーセンテージ クローザー ソフト シャドウ (PCSS)が働くのでそこが悪さしているのか、、、という感じです。ソフトシャドウの質はAngular DiameterとSampleCountによると記載があるのでそちらを調整します。
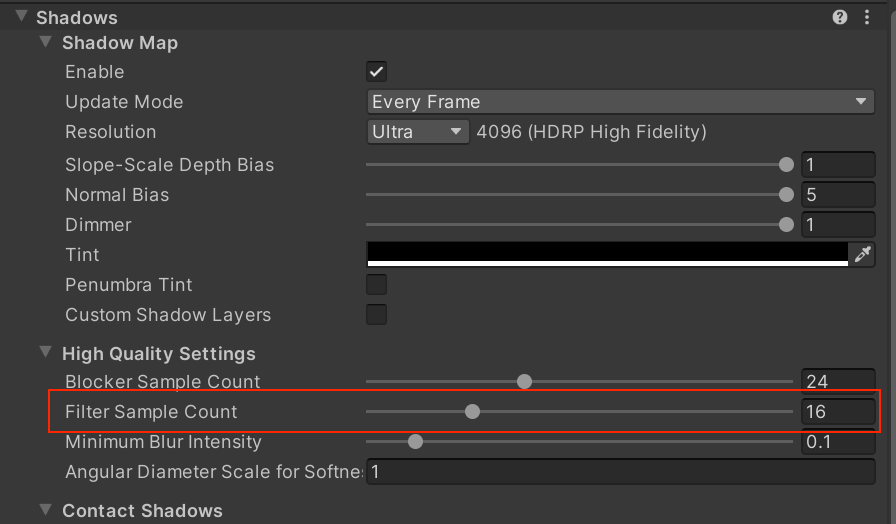
スクリーンスペースによるものなのでサンプリング回数を上げれば軽減します。サンプリング回数はライトのほうの設定のShadow欄にある「Filter Sample Count」なのでこちらを上げれば軽減します。
ただ今回はMaxのサンプリング数64にしても軽減しなかったのでAngular Diameter Scale For Softnessを下げました。
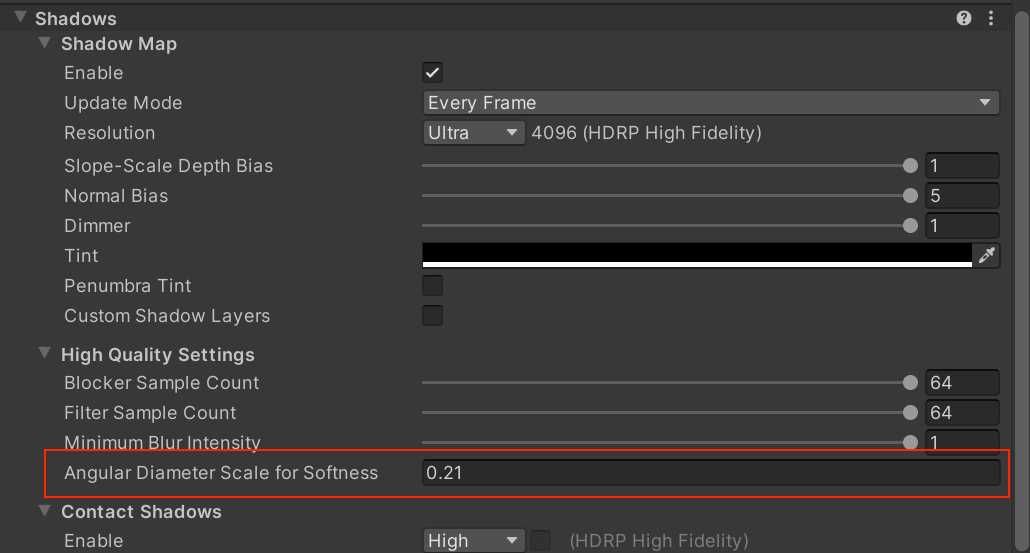
もちろんサンプリング回数を上げるということは負荷も上がるということだと思うのでこの辺は二つの変数をいいかんじに調整する必要がありそうですね。
2つ目はProjectSettingsでQuality>HDRP>Shadowsの「Shadow Filtering Quality」をHighからMidiumに変更することです。
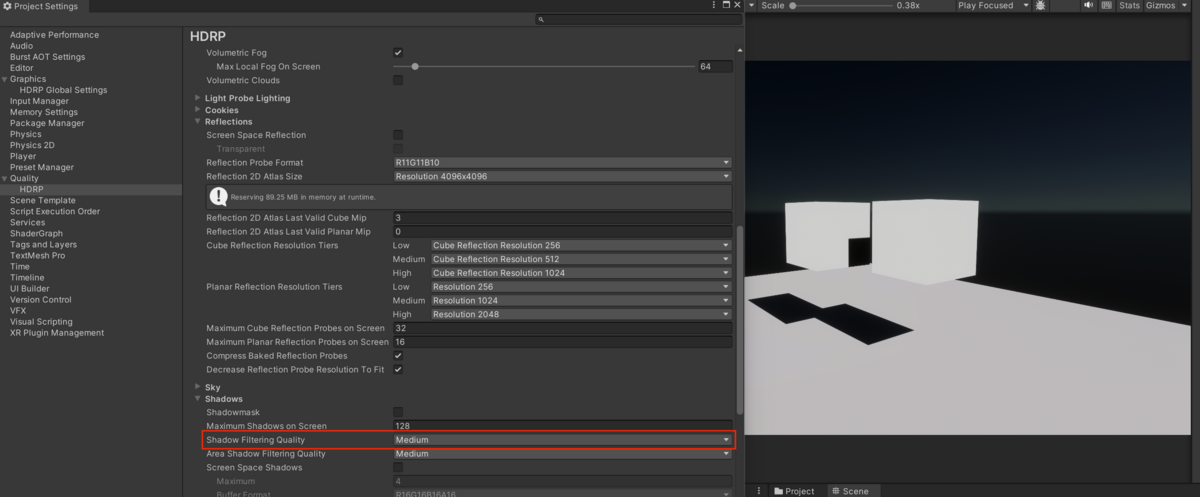
HighからMediumにするとそもそもPCSSではなくなるので汚く見えなくなった。というだけになります。
これらの方法のどちらかをとると今回のような見た目に見えます。
おわりに
HDRPで影を落とし、影を受ける方法について書いてみました。
次はライトの影響を受けてシェーディングできる方法について書こうと思います。